Accurate measurement of a ball’s radius often requires specific tools. This guide explains how to measure radius of a ball with tool. For instance, a precise caliper offers direct readings. Spherical geometry, a branch of mathematics, provides the theoretical foundation. Furthermore, understanding measurement uncertainty is crucial for accuracy. Metrology labs use advanced techniques to calibrate measurement instruments. This guide simplifies the practical methods.
The world is full of spheres, from the mundane—like marbles and sports equipment—to the monumental—like ball bearings in complex machinery. Understanding and accurately measuring the properties of these spherical objects, particularly their radius, is surprisingly crucial across many disciplines. This guide aims to demystify the process, providing accessible methods for anyone to determine a ball’s radius using readily available tools.
Defining the Ball and its Radius
In mathematical terms, a ball is defined as a solid figure bounded by a spherical surface. Imagine a perfectly round orange; that’s a ball. The radius is the distance from the center of this sphere to any point on its surface. It’s a fundamental measurement that unlocks other properties, such as volume and surface area.
Why Accurate Radius Measurements Matter
The radius is not just a theoretical construct; it has real-world implications.
-
In engineering, precise radius measurements are essential for designing ball bearings, lenses, and other spherical components.
-
Sports equipment manufacturers rely on accurate measurements to ensure balls meet official regulations for size and performance.
-
In manufacturing, consistency in ball size is critical for quality control and proper functionality of various products.
Without accurate measurements, designs can fail, equipment can underperform, and manufacturing processes can become unreliable.
Measuring Made Simple: An Overview
This article serves as a practical guide to measuring the radius of a ball, regardless of its size or material. We will explore several methods, ranging from simple techniques using a ruler to more precise approaches employing calipers and tape measures. The goal is to empower you with the knowledge and skills to obtain accurate measurements using the tools you have available. We aim to make the process straightforward and effective, ensuring reliable results every time.
The implications of accurate radius measurements are clear. But before diving into specific techniques, it’s essential to build a solid foundation. This involves understanding the fundamental concepts that underpin all radius measurements, and how geometry plays a crucial role.
Understanding the Fundamentals: Radius, Diameter, and Geometry
Defining Radius and Diameter
At the heart of measuring spheres lies the relationship between the radius and the diameter. The radius is defined as the distance from the center of the sphere to any point on its surface.
Conversely, the diameter is the distance across the sphere passing through its center. Crucially, the radius is always half the length of the diameter.
This relationship, expressed as radius = diameter / 2, is the cornerstone of many radius measurement techniques.
The Significance of Precise Measurement
While the formula connecting radius and diameter is simple, achieving accurate results requires careful measurement. Even small errors in measuring the diameter can lead to significant inaccuracies in the calculated radius.
Therefore, precise measurement is paramount. The level of precision required will often depend on the specific application. Some situations may only need an estimate, while others demand near-perfect accuracy.
Geometry’s Role in Radius Measurement
Basic geometric principles are essential for understanding and performing radius measurements. The sphere, by definition, is a three-dimensional object derived from the circle.
Any cross-section through the center of a sphere will always result in a perfect circle. This geometric property allows us to apply the principles of circles to spheres.
For instance, finding the widest point across the sphere when measuring its diameter is essentially finding the diameter of that circular cross-section. Understanding these basic geometric relationships enables us to adapt different measurement tools and techniques effectively.
Method 1: The Ruler’s Role in Radius Estimation
Having grasped the fundamental relationship between radius, diameter, and the geometric properties of spheres, we can now begin exploring practical methods for radius measurement. Starting with the simplest approach, we’ll examine how a common ruler can be used to estimate a ball’s radius, understanding its limitations and best-use cases.
When to Use a Ruler for Radius Estimation
While not the most precise method, using a ruler to estimate the radius of a ball has its place. This approach is particularly suitable when:
-
High precision isn’t required: For quick estimations or when a general idea of the radius is sufficient.
-
Dealing with larger balls: Measuring the diameter of large balls can be cumbersome with smaller tools. A ruler provides a convenient way to get a reasonable estimate.
-
Other tools are unavailable: A ruler is a common household item, making it a readily accessible tool for basic radius estimations.
It’s crucial to understand that the ruler method prioritizes convenience over accuracy. If precision is paramount, consider the methods discussed in later sections.
Step-by-Step Guide: Measuring Diameter with a Ruler
Follow these steps to estimate the diameter of a ball using a ruler:
-
Position the ball: Place the ball on a flat surface. This will act as one reference point for your measurement.
-
Align the ruler: Position the ruler so that its edge is directly against the side of the ball. Make sure that the ruler is measuring the widest point of the ball.
-
Find the Widest Point (Diameter): Carefully align the ruler so it passes across the center of the ball. The center is the widest point.
-
Read the measurement: Note the measurement on the ruler where the ball’s surface ends on the other side. This measurement represents the estimated diameter of the ball.
-
Account for ruler thickness: Be mindful of the ruler’s thickness. If the ruler is significantly thick, it might introduce a slight error.
Calculating the Radius
Once you have measured the diameter (even if it’s just an estimation), calculating the radius is a simple matter of applying the fundamental formula:
Radius = Diameter / 2
For example, if you measured the diameter of a ball to be 8 cm using a ruler, the estimated radius would be:
Radius = 8 cm / 2 = 4 cm
Remember that this calculation is only as accurate as your initial diameter measurement. A slightly misaligned ruler, or a reading taken from a non-diametrical position, will introduce error into the radius calculation.
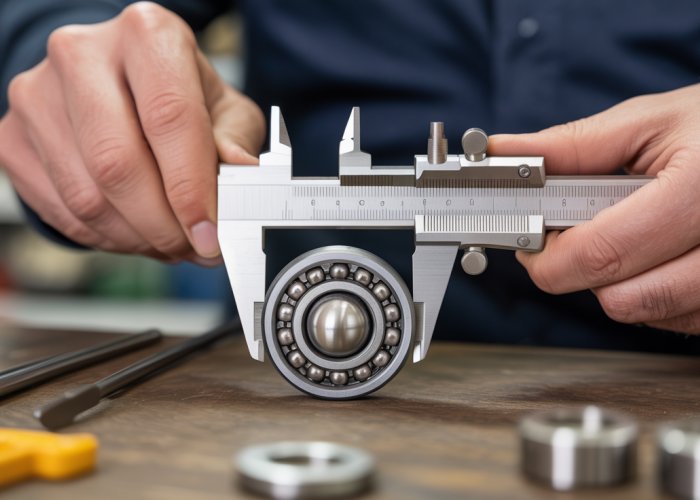
Method 2: Calipers for Enhanced Accuracy
Having explored the ruler’s role in basic radius estimation, it’s time to elevate our measurement precision. Calipers offer a significant step up in accuracy, providing more reliable diameter measurements for balls of various sizes.
Why Choose Calipers?
Calipers are precision instruments designed for accurate length measurements. Unlike rulers, which rely on visual alignment and can be prone to parallax errors, calipers physically clamp onto the object being measured. This direct contact minimizes error and yields more consistent results.
The enhanced accuracy of calipers stems from their design, which allows for finer readings and reduces the impact of user subjectivity. They are particularly useful when greater precision is required, such as in engineering, manufacturing, or scientific applications.
Types of Calipers
Several types of calipers are available, each with its own advantages:
-
Digital Calipers: These calipers display measurements on a digital screen, providing easy-to-read and highly accurate readings. They often include features like zeroing and unit conversion.
-
Analog Calipers: Also known as vernier calipers, these use a vernier scale to achieve precise measurements. They require a bit more practice to read accurately but are reliable and don’t rely on batteries.
Step-by-Step Guide: Measuring Diameter with Calipers
Regardless of the type, the basic procedure for measuring a ball’s diameter with calipers remains the same:
-
Prepare the Calipers: Before measuring, ensure the calipers are clean and properly zeroed. Close the jaws completely and verify that the reading is zero (or as close as possible). For analog calipers, check the alignment of the vernier scale.
-
Position the Ball: Place the ball on a stable surface to prevent it from rolling during measurement.
-
Open the Caliper Jaws: Adjust the caliper jaws to be slightly wider than the estimated diameter of the ball.
-
Position the Calipers: Carefully position the ball between the caliper jaws. The jaws should contact the ball at its widest point, ensuring you’re measuring the true diameter.
-
Apply Gentle Clamping Pressure: Gently close the caliper jaws until they make firm contact with the ball. Avoid applying excessive pressure, which can compress the ball and distort the measurement.
-
Read the Measurement: Read the diameter measurement displayed on the digital screen (for digital calipers) or on the vernier scale (for analog calipers).
-
Record the Measurement: Note the measured diameter for subsequent radius calculation.
Calculating the Radius
Once you have accurately measured the diameter (D) of the ball using calipers, calculating the radius (r) is a simple matter of applying the fundamental formula:
r = D / 2
Divide the measured diameter by 2 to obtain the radius. This calculation provides a more precise radius value compared to using a ruler, thanks to the enhanced accuracy of the caliper measurement.
Having enhanced accuracy with calipers, there are situations where even greater precision is paramount. For those critical applications demanding the utmost accuracy, the micrometer stands as the instrument of choice.
Method 3: Micrometer Precision: When Accuracy Matters Most
The micrometer is a precision instrument designed for extremely accurate measurements of small distances. Unlike rulers or even calipers, micrometers offer unparalleled accuracy, often down to the thousandth of an inch (or micrometer).
This level of precision makes them invaluable in fields like precision engineering, quality control, and scientific research where even the slightest deviation can have significant consequences.
When to Employ a Micrometer
Micrometers aren’t typically used for measuring everyday objects. Their specialized use cases arise when extreme accuracy is critical:
- Precision Engineering: Manufacturing components with tight tolerances.
- Quality Control: Verifying dimensions of manufactured parts against stringent specifications.
- Scientific Research: Measuring minute changes in dimensions for experimental purposes.
- Material Testing: Assessing the deformation of materials under stress.
Micrometers are best suited for measuring relatively small, rigid objects where direct contact is possible and consistent pressure can be applied without damaging the object.
Step-by-Step Guide: Measuring Diameter with a Micrometer
Using a micrometer requires a delicate touch and careful attention to detail. Here’s a step-by-step guide:
-
Prepare the Micrometer: Before each measurement, ensure the micrometer is clean and properly calibrated. Use a specialized wrench to bring the spindle and anvil into contact, and verify that the reading is zero.
-
Position the Ball: Carefully place the ball between the anvil and the spindle of the micrometer.
-
Advance the Spindle: Rotate the thimble (or the ratchet, if equipped) to gently advance the spindle towards the ball.
-
Apply Consistent Pressure: Avoid over-tightening. Most micrometers have a ratchet mechanism that clicks when the appropriate pressure is applied. This ensures consistent measurements. If your micrometer lacks a ratchet, use a very light touch.
-
Read the Measurement: Micrometers have a main scale and a thimble scale. The main scale indicates the measurement in larger increments, while the thimble scale provides finer readings. Combine the two readings to obtain the final measurement. Digital micrometers will display the measurement on a screen.
-
Record the Measurement: Record the measurement immediately to avoid errors.
Calculating the Radius
Once you have accurately measured the diameter of the ball using the micrometer, calculating the radius is a simple matter of division:
Radius = Diameter / 2
This formula holds true regardless of the measurement tool used, but the precision of the micrometer ensures the most accurate radius calculation possible.
Having enhanced accuracy with calipers, there are situations where even greater precision is paramount. For those critical applications demanding the utmost accuracy, the micrometer stands as the instrument of choice.
Method 4: Tape Measure Tactics: Circumference and Radius for Larger Spheres
While rulers, calipers, and micrometers excel at direct diameter measurements, they become unwieldy for larger or unusually shaped spherical objects. In these cases, measuring the circumference with a tape measure offers a more practical and accurate approach to determining the radius.
This method leverages the inherent relationship between a sphere’s circumference and its radius, offering a straightforward calculation to derive the desired measurement.
When Circumference Measurement is Ideal
The tape measure method shines when dealing with balls that are too large to be easily handled with calipers or micrometers. Consider situations such as:
- Measuring a large exercise ball.
- Determining the radius of a globe.
- Assessing the size of a spherical architectural element.
In these scenarios, attempting to directly measure the diameter would be cumbersome and prone to error. Measuring the circumference offers a more stable and manageable alternative.
Accurately Measuring Circumference with a Tape Measure
Follow these steps to ensure an accurate circumference measurement:
-
Choose a Flexible Tape Measure: Opt for a flexible, non-stretchable tape measure for best results. Cloth or fiberglass tapes are ideal.
-
Mark a Starting Point: Use a marker or piece of tape to clearly identify a starting point on the ball’s surface.
-
Wrap the Tape Measure: Carefully wrap the tape measure around the ball, ensuring it follows the greatest circumference. This is the path that divides the sphere into two equal halves.
-
Maintain Proper Tension: Keep the tape measure snug against the ball’s surface without stretching or distorting it.
-
Read the Measurement: Align the end of the tape measure with the starting point and record the circumference reading.
Calculating the Radius from Circumference
Once you have the circumference (C), you can easily calculate the radius (r) using the following formula:
r = C / (2 π)
Where:
- r = radius
- C = circumference
- π (pi) ≈ 3.14159
For example, if you measure the circumference of a ball to be 100 cm:
r = 100 cm / (2 * 3.14159)
r ≈ 15.92 cm
Therefore, the radius of the ball is approximately 15.92 centimeters. This calculation provides a reliable and accurate method for determining the radius of larger spherical objects when direct diameter measurements are impractical.
Tips and Tricks: Achieving Accurate Measurements
Even with the right tools and techniques, subtle factors can influence the accuracy of your radius measurements. This section provides practical advice to minimize errors and optimize your results, ensuring the most precise measurements possible.
Ensuring Stability and Proper Positioning
Stability is paramount for accurate measurements. If the ball moves during the measurement process, the reading will be inaccurate.
- Use a stable surface to support the ball, and if necessary, use clamps or a custom jig to hold it securely in place.
- For smaller balls, consider using a V-block to cradle the sphere and prevent rolling.
- Ensure the ball is clean and free from debris that could interfere with the measuring tool’s contact.
Minimizing Parallax Error
Parallax error occurs when the apparent position of an object changes due to the observer’s viewing angle. This is especially relevant when reading analog scales on rulers, calipers, or micrometers.
- Always view the scale directly from above, perpendicular to the measurement markings.
- Avoid viewing the scale from an angle, as this will introduce error.
- If using a digital instrument, parallax is eliminated, providing a more reliable reading.
Understanding Tool Limitations and Choosing the Right Instrument
Each measurement tool possesses inherent limitations in precision. Selecting the appropriate tool is crucial for achieving the desired level of accuracy.
Ruler: Quick Estimation
Rulers offer a quick and convenient way to estimate the radius, but lack the precision needed for critical applications. Their primary use is for getting a rough idea of the size, especially for larger objects where high accuracy isn’t required.
Calipers: Enhanced Accuracy
Calipers provide a significant improvement in accuracy over rulers. Digital calipers offer the best of both worlds – ease of use and precise readings.
- They are suitable for a wide range of ball sizes and can deliver reliable measurements when properly used.
- Analog calipers require careful reading to avoid parallax errors.
Micrometers: Precision Measurement
Micrometers are the gold standard for precise measurements. Their finely threaded screw mechanism allows for extremely accurate readings, making them ideal for applications where even minute errors are unacceptable.
- Micrometers are best suited for smaller balls due to their limited range.
- Mastering the use of a micrometer requires practice and careful attention to detail.
Tape Measure: Large Spheres
The tape measure, while useful for determining circumference, introduces its own set of potential errors.
- The flexibility of the tape can lead to inconsistencies in measurement, and ensuring the tape follows the great circle (the largest circumference) is challenging.
- It is crucial to minimize slack and ensure the tape is taut but not stretched.
Taking Multiple Measurements and Averaging
To minimize the impact of random errors, it’s highly recommended to take multiple measurements and calculate the average.
- Random errors are unpredictable variations that can occur due to slight inconsistencies in technique or environmental factors.
- By averaging several measurements, these random errors tend to cancel each other out, resulting in a more accurate overall result.
- Discard any outliers (measurements that are significantly different from the others) before calculating the average.
FAQs: Measuring a Ball’s Radius
Here are some frequently asked questions to help you better understand how to measure the radius of a ball.
Why is knowing the radius of a ball important?
Knowing a ball’s radius is crucial in various fields, from engineering and physics to sports and manufacturing. It’s essential for calculating volume, surface area, and other properties, and often needed to achieve specific functionality or design constraints.
What’s the easiest way to measure the radius of a ball without special tools?
The "sandwich" method, as described in the guide, is a simple way to measure the diameter and then calculate the radius. Simply place the ball between two flat surfaces, measure the distance between them using a ruler, and divide by two. This method demonstrates how to measure radius of a ball with tool like a ruler.
My ball is too big for my calipers or measuring tools. What can I do?
For larger balls, consider using a tape measure to find the circumference. Then, divide the circumference by 2π (approximately 6.28) to get the radius. This is a practical alternative when standard tools are insufficient.
Are there any inaccuracies to be aware of when measuring a ball’s radius?
Yes, surface imperfections or slight deformities of the ball can affect the accuracy. Always try to take multiple measurements from different angles and average them out. This helps mitigate the impact of these imperfections and gives a more accurate result of how to measure radius of a ball with tool or without tool.
So, there you have it! Measuring the radius of a ball might seem tricky, but hopefully, you now feel confident using a tool. Now you know **how to measure radius of a ball with tool**, go give it a try, and happy measuring!