Achieving precise bends in acrylic sheets, particularly when working with a 50cm area, requires careful consideration of several factors. Acrylic’s thermoplastic nature, a key entity, necessitates controlled heat application, typically achieved using a strip heater. This specialized equipment ensures uniform heating along the bending line. Furthermore, accurate bending often relies on the use of jigs and molds. These tools, central to techniques used by professional fabricators, provide physical support and ensure the desired shape is maintained during the cooling process. Proper ventilation, adhering to guidelines recommended by organizations like OSHA, is vital. This safeguards against the inhalation of fumes released during heating. Therefore, mastering tips for bending large acrylic over a 50cm area hinges on understanding these processes and their impact on the final product. Following instructions from the materials manufacturere is essential.
Bending acrylic sheets opens up a world of possibilities for DIY projects, artistic endeavors, and professional fabrication. However, when dealing with larger sheets, specifically those within a 50cm area, the challenge intensifies. Achieving clean, precise bends without imperfections becomes significantly more difficult.
The Hurdles of Large Acrylic Bending
Many encounter common frustrations when attempting to bend these larger acrylic pieces. These include:
- Uneven heating, leading to inconsistent bends.
- Bubbling or scorching caused by overheating.
- Stress marks and distortions that mar the final product.
- Difficulty maintaining the desired shape and radius.
These issues can be disheartening, often resulting in wasted material and a less-than-professional outcome.
The Importance of Mastering Proper Bending Techniques
Understanding and applying proper bending techniques is absolutely essential for overcoming these hurdles. It’s the difference between a frustrating failure and a satisfying success.
- Consistency: Correct techniques ensure consistent, repeatable results.
- Quality: They minimize imperfections and maximize the aesthetic appeal of the finished product.
- Efficiency: Mastering these skills reduces material waste and saves valuable time.
- Structural Integrity: Proper bending maintains the structural integrity of the acrylic.
Article Scope: Focus on the 50cm Area
This article provides specific techniques and practical tips tailored to bending acrylic sheets within a 50cm area. We will delve into the nuances of heat application, jig design, and cooling processes to achieve optimal results within this size range.
This targeted approach ensures that the information is directly relevant and immediately applicable to your projects.
Who Will Benefit from This Guide?
This comprehensive guide is designed to empower a wide range of individuals.
- DIY Enthusiasts: Those looking to enhance their skills and create custom acrylic projects.
- Hobbyists: Model makers, craftspeople, and artists who use acrylic in their creations.
- Professional Fabricators: Seeking to refine their techniques and improve the quality of their work.
Regardless of your experience level, this article provides valuable insights and practical advice to unlock your acrylic bending potential. By mastering the techniques outlined, you can confidently tackle ambitious projects and achieve professional-quality results, transforming your vision into reality.
Understanding Acrylic: Properties, Types, and Preparation
Before committing heat and force to bend an acrylic sheet, a solid understanding of the material itself is paramount. Acrylic isn’t simply "plastic"; it’s a diverse family of polymers with specific behaviors under heat and stress. The following sections delve into these crucial aspects.
Acrylic Properties Relevant to Bending
Acrylic’s unique material properties dictate how it responds to heat and bending. Mastering these concepts will significantly improve the accuracy and quality of your finished product.
Softening Point: Acrylic doesn’t have a distinct melting point like metal. Instead, it gradually softens over a temperature range. Knowing the softening point, typically between 80°C and 100°C (176°F and 212°F), is critical to prevent overheating.
Thermal Conductivity: Acrylic’s low thermal conductivity means it heats unevenly. Hotspots can develop quickly if you’re not careful. Precise control over heat application is thus crucial.
Expansion Coefficient: Acrylic expands significantly when heated. This expansion must be considered when designing jigs and forms to prevent unwanted stress or distortion during the bending process. Ensure your jig allows for slight material expansion.
Acrylic Thickness: Balancing Strength and Bendability
Selecting the correct acrylic thickness is not merely about aesthetics. It’s a critical engineering decision that impacts both structural integrity and the ease of bending.
Thinner sheets (e.g., 2-3mm) are easier to bend and require less heat. However, they are also more prone to warping and may lack the necessary rigidity for load-bearing applications.
Thicker sheets (e.g., 6mm or more) offer greater strength and are less likely to deform after bending. But they require significantly more heat and force to manipulate, increasing the risk of overheating and stress fractures.
Consider the following when choosing thickness:
- Load Requirements: How much weight or stress will the bent acrylic need to withstand?
- Bend Radius: Tighter bend radii generally require thinner material to prevent cracking.
- Aesthetic Considerations: The desired visual impact of the final product.
Cast vs. Extruded Acrylic: Knowing the Difference
Acrylic comes in two primary forms: cast and extruded. While they may look similar, their molecular structures differ, influencing their bending characteristics.
Cast Acrylic is produced by pouring liquid monomer between two sheets of glass or stainless steel. This results in a more homogenous material with better optical clarity and chemical resistance. Cast acrylic generally performs better for intricate bends because it is more resistant to cracking.
Extruded Acrylic is manufactured by continuously pushing molten acrylic through a die. This process creates internal stresses within the material, making it more prone to cracking and crazing during bending. It’s typically less expensive than cast acrylic, but it’s also less forgiving.
Always identify the type of acrylic you’re working with before commencing the bending process and adjust your techniques accordingly. Cast acrylic can generally withstand higher temperatures and more aggressive bending, while extruded acrylic requires a more gradual and controlled approach.
Pre-Bending Preparation: Setting the Stage for Success
Proper preparation is just as vital as the bending process itself. Skimping on these steps can lead to avoidable defects and wasted material.
- Cleaning: Thoroughly clean the acrylic sheet with a mild soap and water solution. Remove all traces of dirt, grease, and fingerprints. Use a microfiber cloth to prevent scratching.
- Drying: Ensure the acrylic is completely dry before proceeding. Any moisture can cause bubbling or discoloration during heating.
- Masking (Optional): Apply painter’s tape or masking film to areas you want to protect from heat or scratches. This is particularly useful when using a heat gun.
- Marking: Accurately mark the bending lines using a fine-tip marker or grease pencil. Use a ruler or template to ensure precision. Accurate markings are crucial for achieving the desired dimensions and angles.
- Edge Finishing (If Necessary): If the edges are rough or uneven, smooth them with fine-grit sandpaper to prevent stress concentrations that could lead to cracking during bending.
By meticulously preparing your acrylic sheet, you lay the foundation for a successful and aesthetically pleasing bending project. Remember, attention to detail in these initial steps will save you time, frustration, and material in the long run.
Tools and Techniques: Heat Gun, Strip Heater, and Oven Methods Compared
Acrylic’s carefully chosen thickness sets the stage; now, we turn our attention to the methods we can employ to bring the sheet to a pliable state. Each heating method brings its own set of advantages and disadvantages to the table. Selecting the best tool will depend greatly on the size of the acrylic sheet, the complexity of the bend, and the level of precision required.
Heat Gun Technique
The heat gun is a versatile tool that offers flexibility for localized heating.
However, achieving consistent results requires a steady hand and a keen understanding of heat distribution.
Effective Heat Gun Use
To use a heat gun effectively for acrylic bending, start by holding the nozzle several inches away from the surface.
Use a sweeping motion to distribute the heat evenly across the area you intend to bend.
Avoid holding the heat gun in one spot for too long.
Doing so can lead to bubbling or scorching, especially with thinner acrylic sheets.
Preventing Common Issues
Bubbling, scorching, and uneven heating are common pitfalls when using a heat gun.
To avoid these problems, maintain a consistent distance and speed throughout the heating process.
Regularly check the temperature of the acrylic by feeling the surface (with a gloved hand) or using an infrared thermometer.
Temperature Monitoring
Temperature monitoring is critical.
Acrylic softens gradually, and it’s easy to overshoot the ideal bending point.
Use a non-contact infrared thermometer to monitor the surface temperature.
Aim for the lower end of the softening range (80°C to 100°C or 176°F to 212°F) and allow the heat to penetrate gradually.
Best Use Cases
The heat gun is best suited for smaller projects, localized bends, or making fine adjustments to a bend created using another method.
It provides a high degree of control, making it useful for intricate shapes.
However, it is not ideal for uniformly heating large areas due to the risk of uneven heating.
Strip Heater Technique
A strip heater offers a more controlled and consistent heating method, particularly advantageous for bending larger areas of acrylic.
The consistent heat output and focused application minimize the risk of uneven heating.
Benefits of Strip Heaters
Strip heaters excel at providing uniform heating, which is essential for creating clean, consistent bends across larger areas.
The focused heat allows for precise control over the bending zone.
This reduces the risk of warping or distortion in areas that shouldn’t be affected.
Setup and Calibration
Setting up a strip heater involves adjusting the height and position of the heating element to achieve the desired heat distribution.
Calibrate the temperature settings by testing on scrap pieces of acrylic.
Ensuring even heat distribution prevents hotspots and ensures the acrylic softens uniformly along the bending line.
Controlling Temperature and Time
Controlling the temperature and heating time is crucial for achieving the desired bend without overheating or scorching the acrylic.
Refer to the manufacturer’s recommendations for temperature settings.
Start with lower settings and gradually increase the heat until the acrylic begins to soften.
Monitor the acrylic closely and adjust the heating time to achieve the desired bend radius.
Minimizing Stress Marks
To minimize stress marks when using a strip heater, ensure the acrylic is clean and free of debris before heating.
Use a soft, non-abrasive cloth to wipe down the surface.
Avoid applying excessive pressure during the bending process.
Allow the acrylic to cool gradually to minimize stress.
Oven Technique
Using an oven to heat acrylic offers the most consistent and uniform heating but requires careful setup and monitoring.
Suitable Oven Types
Convection ovens are generally preferred for heating acrylic because they circulate hot air evenly around the sheet.
This reduces the risk of hotspots and ensures that the acrylic softens uniformly.
Avoid using ovens with exposed heating elements, as they can cause localized overheating.
Oven Setup
Proper oven setup is crucial for successful acrylic bending.
Preheat the oven to the correct temperature based on the acrylic thickness and desired bend radius.
Ensure the oven is well-ventilated to prevent the buildup of fumes.
Place the acrylic sheet on a flat, non-stick surface to prevent it from sticking to the oven rack.
Optimal Time and Safety
Determine the optimal heating time by testing on scrap pieces of acrylic.
Monitor the acrylic closely and remove it from the oven as soon as it becomes pliable.
Wear heat-resistant gloves when handling the hot acrylic sheet.
Keep a fire extinguisher nearby and avoid using the oven near flammable materials.
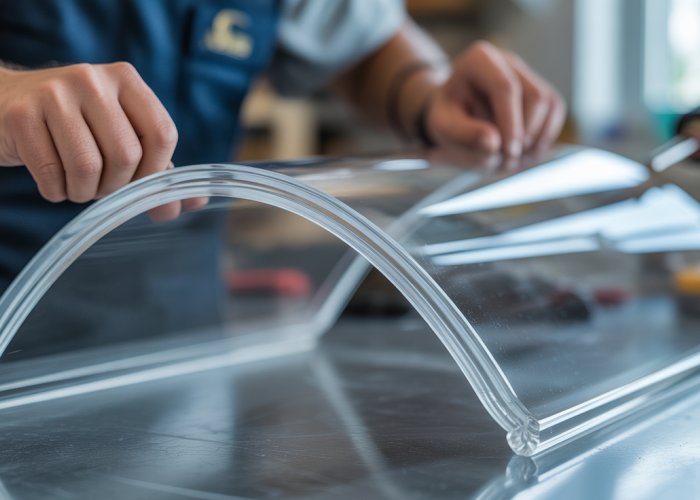
Acrylic’s pliability, coaxed out with heat, offers immense potential for shaping and forming. Yet, without careful control, that very flexibility can become a source of imprecision. This is where bending jigs and forms step into the spotlight, becoming indispensable allies in the pursuit of accurate and repeatable results.
Bending Jigs and Forms: The Key to Precision and Repeatability
A bending jig is more than just a frame; it’s a meticulously crafted tool that dictates the outcome of the bending process. When working with larger acrylic sheets, particularly those within a 50cm area, the influence of a well-designed jig becomes even more pronounced. It’s the difference between a haphazard curve and a precisely engineered arc.
The Indispensable Bending Jig
The inherent challenge with bending acrylic lies in its tendency to deform unevenly during heating and cooling. Gravity, internal stresses, and inconsistent temperature distribution can all conspire to warp the material and compromise the intended shape.
A bending jig actively counteracts these forces by providing external support and guiding the acrylic along a predetermined path. It ensures that the bend occurs at the desired location, to the correct radius, and without unwanted distortions.
Designing Your Custom Bending Jig
Crafting a custom bending jig tailored to your specific 50cm area acrylic bending project is an investment that pays dividends in accuracy and efficiency.
Material Selection:
Wood, metal, and even rigid plastics can be used.
Wood is easily workable for prototyping, while metal offers greater durability for repeated use. The chosen material should be stable and resistant to warping under pressure and moderate heat.
Construction Tips:
Begin with a precise template or CAD drawing of the desired bend profile.
Accurately transfer this profile onto the jig material. Consider using a combination of mechanical fasteners (screws, bolts) and adhesives to ensure a robust and long-lasting construction.
Reinforce critical areas, such as the bend apex, to prevent the jig itself from deforming under the stress of bending.
Exploring Various Jig Designs
The optimal jig design hinges on the specific bending parameters: the intended angle, the desired shape, and the acrylic thickness.
Simple Angle Bends:
For straightforward 90-degree or acute angle bends, a simple L-shaped jig with a clamping mechanism may suffice. The inside corner of the "L" defines the bend radius.
Curved Shapes:
For more complex curves, consider using a contoured form made from plywood or MDF. The acrylic is heated and then draped over the form, conforming to its shape as it cools.
Multi-Bend Jigs:
Projects requiring multiple bends at different angles might benefit from a more elaborate jig with adjustable components. These allow for incremental bending and precise positioning.
Controlling the Bend
The bending jig is a critical tool during the cooling phase.
It should fully constrain the acrylic until it has cooled. This is key to minimizing distortion and ensuring that the final piece matches your intended design.
Proper alignment within the jig is crucial. Misalignment during cooling can introduce stresses that lead to warping or even cracking.
Effective Clamping Strategies
Consistent pressure is key to achieving consistent bends. Clamping within the jig is vital to preventing warping and ensuring uniform contact between the acrylic and the jig’s surface.
Types of Clamps:
Spring clamps are suitable for applying gentle, even pressure across a wide area. Toggle clamps provide a more secure hold and are ideal for restraining edges and corners.
Strategic Placement:
Position clamps strategically along the bend line to prevent the acrylic from lifting or shifting during cooling. Avoid over-tightening the clamps, as this can create stress concentrations and lead to cracking.
Bending jigs and forms have been discussed as essential tools, guiding the acrylic into shape with precision. But even with the perfect jig, the execution of the bending process itself is paramount. It’s a dance between heat, material, and control, where each step must be carefully orchestrated to achieve the desired outcome.
Step-by-Step Bending: Mastering the Process
The journey to a perfectly bent acrylic sheet hinges on a methodical approach. Each phase—pre-heating, forming, and cooling—plays a critical role in the final result. Understanding the nuances of each step will elevate your acrylic bending from a game of chance to a display of craftsmanship.
Pre-heating for Optimal Flexibility
Pre-heating is arguably the most critical phase. It sets the stage for a smooth and even bend. The choice of heating method (heat gun, strip heater, or oven) will influence the specific steps, but the underlying principles remain the same: even heat distribution and careful temperature monitoring.
-
Heat Gun: Direct the heat in a sweeping motion, maintaining a consistent distance from the acrylic surface. Avoid concentrating the heat in one spot to prevent bubbling or scorching.
-
Strip Heater: Ensure the acrylic is centered over the heating element for uniform heating. Adjust the height of the heater to control the intensity of the heat.
-
Oven: Place the acrylic on a flat, non-stick surface to prevent warping. Convection ovens are preferred for their even heat distribution.
Regardless of the method, knowing the proper temperature for your specific acrylic type and thickness is crucial. Too little heat and the acrylic will resist bending. Too much, and it could deform uncontrollably. Use a non-contact infrared thermometer to monitor the surface temperature accurately.
General temperature guidelines are as follows (but always refer to your acrylic manufacturer’s specifications):
- Thin acrylic sheets (3mm or less): 150-160°C (302-320°F)
- Medium acrylic sheets (3mm – 6mm): 160-170°C (320-338°F)
- Thick acrylic sheets (over 6mm): 170-180°C (338-356°F)
Heating times will vary depending on the method and thickness of the acrylic. Start with shorter intervals and gradually increase the time until the acrylic becomes pliable.
Monitoring Temperature for Consistent Results
Consistent monitoring of the acrylic’s temperature during the heating process is essential. Acrylic doesn’t change linearly in temperature, and it doesn’t conduct temperature evenly. The goal is to bring the entire sheet, or at least the area to be bent, to a uniform, pliable state.
An infrared thermometer is your best friend here. Periodically check the temperature at various points on the acrylic surface. This will help you identify hot spots or areas that are heating unevenly.
Adjust your heating technique accordingly. Move the heat gun more slowly over cooler areas, or adjust the placement of the acrylic on the strip heater or in the oven. The key is to achieve a consistent temperature across the entire bending area.
The Art of Even Heating
Even heating is paramount for achieving clean, consistent bends. Uneven heating can lead to several problems, including:
- Stress Concentrations: Areas that are heated more than others will be more prone to cracking or breaking during bending.
- Warping: Uneven heating can cause the acrylic to warp or distort, compromising the final shape.
- Bubbling: Overheating localized areas can lead to bubbling, especially in lower-quality acrylic.
To ensure even heating, use a consistent heating technique, monitor the temperature carefully, and rotate the acrylic as needed. Don’t rush the process; take your time to achieve a uniform temperature across the entire bending area.
Forming the Acrylic with Precision
Once the acrylic is sufficiently heated and pliable, the forming process begins. This is where the bending jig comes into play. Carefully remove the acrylic from the heat source and immediately place it onto the jig.
- Smooth and Controlled Movements: Avoid jerky or abrupt movements. Guide the acrylic slowly and deliberately over the jig, ensuring it conforms to the desired shape.
- Proper Alignment: Ensure the bending line on the acrylic aligns perfectly with the corresponding feature on the jig. This will ensure the bend occurs at the correct location and angle.
- Gentle Pressure: Apply gentle, even pressure to form the acrylic around the jig. Avoid forcing the material, as this can lead to stress marks or cracking.
If you’re bending a complex shape, you may need to use clamps or other holding devices to secure the acrylic to the jig. Ensure the clamps are padded to prevent scratching or marring the surface.
Cooling for Dimensional Stability
The cooling process is just as important as the heating and forming phases. It allows the acrylic to solidify in its new shape, ensuring dimensional stability.
- Leave it in the Jig: Allow the acrylic to cool completely within the bending jig. This will prevent warping and ensure it retains its final form.
- Gradual Cooling: Avoid rapid cooling, as this can introduce stress into the material. Allow the acrylic to cool naturally at room temperature.
- Forced Cooling (with caution): In some cases, you can accelerate the cooling process by using a fan. However, be careful not to cool the acrylic too quickly, as this can lead to stress or cracking.
Once the acrylic has cooled completely, carefully remove it from the jig. Inspect the bend for any imperfections or stress marks. If necessary, you can use polishing techniques to remove minor blemishes and achieve a professional finish, which will be covered in a later section.
Bending jigs and forms have been discussed as essential tools, guiding the acrylic into shape with precision. But even with the perfect jig, the execution of the bending process itself is paramount. It’s a dance between heat, material, and control, where each step must be carefully orchestrated to achieve the desired outcome. Now, before we even think about applying heat and shaping acrylic, a crucial aspect often overlooked is the creation of a safe working environment. Neglecting safety protocols can lead to serious injury, rendering the project and the artisan at risk.
Safety First: Protecting Yourself and Your Workspace
Working with heat and potentially volatile materials demands respect and adherence to safety guidelines. Acrylic bending, while rewarding, involves potential hazards that require careful consideration. Prioritizing safety not only protects you from injury but also ensures a focused and productive workspace. Let’s delve into the essential safety measures for successful and secure acrylic bending.
Hand Protection: The Importance of Safety Gloves
Your hands are your primary tools. Protecting them from burns and heat-related injuries is paramount. The radiant heat from heat guns, strip heaters, and ovens can cause severe burns in a matter of seconds.
Investing in high-quality, heat-resistant safety gloves is an absolute necessity. Look for gloves specifically designed for handling hot materials, offering adequate insulation without sacrificing dexterity.
Consider gloves made from materials like Kevlar or heat-resistant silicone, ensuring they provide sufficient protection for the temperatures you’ll be working with.
Always inspect your gloves for any signs of wear or damage before each use. Replace them immediately if you notice any tears, holes, or compromised insulation.
Ventilation: Mitigating Harmful Fumes
The heating process can release fumes from the acrylic material. These fumes, while generally not highly toxic in small quantities, can be irritating to the respiratory system and, in some cases, pose a long-term health risk with prolonged exposure.
Ensuring adequate ventilation is crucial to maintaining a safe and healthy work environment.
Ventilation Strategies
Working outdoors is ideal, as it provides natural airflow to dissipate fumes.
If working indoors, open windows and doors to create cross-ventilation.
Utilize a dedicated exhaust fan to draw fumes away from your breathing zone and vent them outside.
Consider wearing a respirator mask with appropriate filters designed to capture organic vapors, especially if ventilation is limited.
Safe Handling of Hot Acrylic Sheets
Hot acrylic is deceptively dangerous. It may appear solid, but it retains heat for an extended period, and direct contact can cause severe burns.
Always exercise extreme caution when handling heated acrylic sheets. Use appropriate tools, such as heat-resistant tongs or clamps, to manipulate the material whenever possible.
Wear long sleeves and other protective clothing to minimize exposed skin.
Never place hot acrylic directly on flammable surfaces. Use a heat-resistant mat or stand to elevate it and prevent accidental fires.
Allow ample time for the acrylic to cool before handling it with bare hands. Even after initial cooling, the material may still retain enough heat to cause discomfort or burns.
Fire Safety: Preventing and Responding to Emergencies
The combination of heat sources and flammable materials creates a potential fire hazard. Taking proactive fire safety measures is essential to prevent accidents and ensure a swift response in case of an emergency.
Essential Fire Safety Precautions
Keep a fully charged fire extinguisher readily accessible in your workspace. Ensure you know how to use it properly. A Class ABC extinguisher is suitable for most common fires, including those involving plastics and electrical equipment.
Maintain a clean and organized workspace, free from combustible materials such as paper, cardboard, and flammable liquids.
Never leave heating equipment unattended while in operation. Always monitor the temperature and be prepared to shut it down immediately if necessary.
Ensure all electrical equipment is in good working order and properly grounded to prevent electrical fires.
In the event of a fire, evacuate the area immediately and call emergency services.
Bending jigs and forms have been discussed as essential tools, guiding the acrylic into shape with precision. But even with the perfect jig, the execution of the bending process itself is paramount. It’s a dance between heat, material, and control, where each step must be carefully orchestrated to achieve the desired outcome. Now, even a flawlessly executed bend can be undone if the final stages are neglected. The cooling process, in particular, is critical for setting the shape and ensuring long-term stability. And inevitably, despite our best efforts, imperfections can arise. Knowing how to troubleshoot these issues and apply finishing touches is what separates a good project from a truly professional one.
Finishing Touches: Cooling, Troubleshooting, and Achieving a Professional Look
The journey of bending acrylic doesn’t end when the desired shape is achieved. The cooling process, troubleshooting any imperfections, and applying the final touches are equally crucial steps in ensuring a successful and professional-looking outcome. These final stages solidify your hard work and elevate the finished product.
The Critical Role of Controlled Cooling
Cooling is not merely a passive waiting game; it’s an active part of the bending process. Rushing this phase can lead to warping, stress fractures, and a compromised final form. Proper cooling ensures the acrylic retains its intended shape and structural integrity.
The importance of leaving the acrylic within the bending jig during the cooling phase cannot be overstated. The jig acts as a mold, providing support and maintaining the desired curvature as the acrylic gradually returns to room temperature.
This constrained cooling minimizes the risk of distortion and internal stresses.
Allowing the acrylic to cool completely within the jig is the golden rule for achieving lasting results.
Accelerating Cooling Without Compromise
While patience is key, there are techniques to accelerate the cooling process without inducing stress or compromising the integrity of the bend. However, caution is advised.
Fan-Assisted Cooling
Gentle air circulation from a fan can help dissipate heat more quickly. Position the fan to provide a soft breeze across the acrylic surface, avoiding direct blasts of air that could cause uneven cooling.
Water-Assisted Cooling
In some cases, a light mist of water can be applied to the acrylic surface to speed up the cooling process. It is important to apply the water lightly to ensure consistent cooling. This is best suited for thicker sheets.
When to be Cautious
Avoid extreme measures like plunging the acrylic into cold water, as this can create significant stress and lead to cracking or warping. Slow and steady is the mantra here.
Troubleshooting Common Bending Problems
Even with meticulous technique, problems can arise. Recognizing these issues and knowing how to address them is crucial for salvaging your project.
Bubbles
Bubbles often occur when the acrylic is heated too quickly or unevenly.
Preventative measures include using a lower heat setting, ensuring even heat distribution, and allowing the acrylic to preheat gradually. If bubbles do appear, consider carefully drilling out the bubble without impacting the surrounding acrylic.
Stress Marks
Stress marks, also known as crazing, are a network of fine cracks that appear on the surface of the acrylic. They are usually caused by excessive bending force or uneven cooling.
To minimize stress marks, avoid over-bending the acrylic and ensure uniform cooling. Buffing the acrylic surface can help to smooth out minor stress marks.
Uneven Bends
Uneven bends can result from inconsistent heating or improper jig alignment.
Double-check your heating technique and jig setup to ensure even heat distribution and proper support. Reheating the acrylic and re-bending it within the jig may be necessary.
Warping
Warping occurs when the acrylic cools unevenly or is removed from the jig prematurely.
Always allow the acrylic to cool completely within the jig. If warping does occur, try reheating the acrylic and re-clamping it in the jig to correct the shape.
Achieving a Professional Finish: Correcting Imperfections
The final stage involves refining the acrylic to achieve a flawless, professional look.
Polishing Techniques
Polishing is essential for removing minor scratches, blemishes, and stress marks. Start with a coarse polishing compound and gradually work your way to finer grades.
Use a soft cloth or polishing wheel and apply gentle pressure. Polishing compounds designed specifically for acrylic are recommended.
Removing Minor Blemishes
Small imperfections, such as dust particles or fingerprints, can be carefully removed with a plastic scraper or a specialized acrylic cleaner.
Avoid using harsh chemicals or abrasive cleaners, as they can damage the acrylic surface.
Edge Finishing
The edges of the bent acrylic can be smoothed and polished to create a clean, professional look. Use a fine-grit sandpaper followed by a polishing compound to achieve a smooth, glossy edge.
Bending Acrylic Like a Pro: Your Questions Answered
Here are some common questions about bending large acrylic sheets, especially when tackling projects requiring a 50cm area bend.
What’s the best way to heat acrylic for bending a 50cm area?
Line bending is ideal. It provides focused heat to a specific area, allowing for precise bends. You can also use a strip heater, ensuring even heat distribution across the 50cm area to prevent uneven bending or warping. Good heat control is one of the critical tips for bending large acrylic over a 50cm area.
How do I prevent acrylic from bubbling during the bending process?
Bubbling often results from overheating. Reduce the heat intensity or increase the distance between the heat source and the acrylic. Also, ensure your acrylic is clean and dry before heating. Controlling heat is among the top tips for bending large acrylic over a 50cm area.
How can I ensure a clean and precise bend over a 50cm area?
Use a bending jig or form to guide the acrylic as it softens. This helps maintain the desired angle and prevents unwanted distortions. Apply even pressure during the bending process and allow the acrylic to cool completely in the jig. Using a jig is one of the valuable tips for bending large acrylic over a 50cm area.
What thickness of acrylic is best suited for bending over a 50cm area?
Acrylic sheets between 3mm and 6mm are generally easier to bend. Thicker sheets require more heat and may be more prone to cracking. The optimum thickness depends on the final application, but for easier manipulation, aim for the lower end of this range. Understanding your materials is one of the key tips for bending large acrylic over a 50cm area.
So, there you have it! We hope these insights and tips for bending large acrylic over a 50cm area help you on your next project. Happy crafting!