The captivating art of charcoal evergreen drawing starts with understanding the fundamentals. Kneaded erasers, a crucial tool for achieving subtle highlights, allow artists to manipulate light and shadow in astonishing ways. The Audubon Society, with their dedication to nature and conservation, can be a source of inspiration for accurately depicting evergreen species. Consider studying the works of Albrecht Dürer, whose mastery of detail provides exceptional examples of botanical illustration to inform your charcoal evergreen drawing techniques. Compositional skills taught in fine art workshops are invaluable, helping you create dynamic and balanced portrayals of these majestic trees.
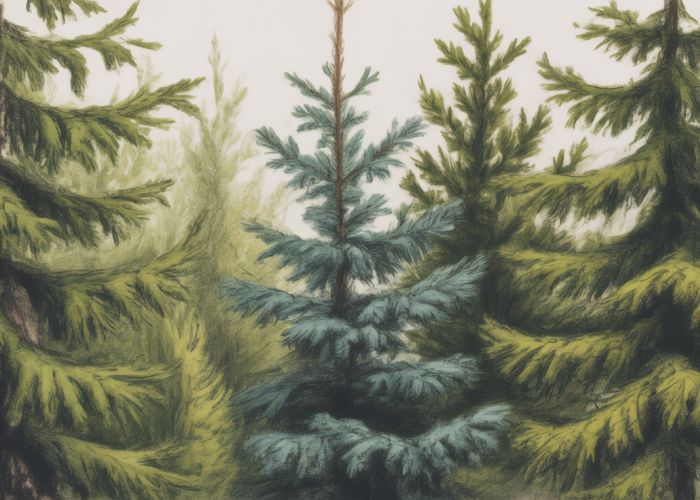
Unlocking the Secrets to Stunning Charcoal Evergreen Drawings
Ever wanted to capture the majestic beauty of evergreens with charcoal? It’s totally achievable! This guide will help you structure your article about "charcoal evergreen drawing" so it’s both informative and inspiring for your readers. We’ll break down the best layout to teach them the secrets to creating captivating evergreen artwork.
Starting Strong: The Introduction
The introduction is your chance to hook the reader and set the stage for their artistic journey.
-
Grab Attention: Begin with a captivating image of a finished charcoal evergreen drawing. Think dramatic lighting or a particularly detailed texture.
-
Define the Topic: Clearly state that the article will teach readers how to create beautiful charcoal evergreen drawings. For example: "Learn how to create stunning evergreen landscapes with the simple power of charcoal!"
-
Highlight Benefits: Explain why drawing evergreens with charcoal is rewarding.
- Emphasize the versatility of charcoal for creating depth and texture.
- Mention the meditative and relaxing qualities of the process.
- Suggest its accessibility for artists of all levels.
-
Tease the Content: Briefly outline what the reader will learn. Hint at the specific techniques and secrets you’ll reveal.
Essential Materials: Setting the Stage for Success
This section should detail the tools and materials needed to create beautiful charcoal evergreen drawings. A well-prepared artist is a successful artist!
-
List Essential Supplies:
- Charcoal Types: Willow charcoal, vine charcoal, compressed charcoal, charcoal pencils (various grades).
- Paper: Charcoal paper, toned paper, smooth paper (experiment!).
- Erasers: Kneaded eraser, gum eraser, pencil eraser.
- Blending Tools: Tortillions, blending stumps, soft cloths, even your fingers!
- Fixative: To prevent smudging (optional, but recommended).
- Other Useful Items: Sharpener, drawing board, clips.
-
Explain the Purpose of Each Tool: Don’t just list; explain!
- For instance: "Willow charcoal is ideal for light sketching and laying down initial values because it’s soft and easy to erase. Compressed charcoal, on the other hand, provides rich, dark tones but is less forgiving."
-
Include Visuals: A picture of all the supplies laid out is super helpful!
Mastering Basic Techniques: Building the Foundation
This section is where you’ll teach the fundamental techniques required for successful "charcoal evergreen drawing."
-
Sketching Fundamentals:
- Light Outlines: Start with very light willow charcoal sketches to map out the overall shape and composition of the evergreen(s).
- Proportion and Perspective: Briefly touch upon the importance of accurate proportions and how perspective affects the appearance of evergreens at different distances.
-
Charcoal Application Techniques:
-
Hatching and Cross-Hatching: Demonstrate how to create tonal variations and texture using hatched and cross-hatched lines. Include visual examples!
-
Consider using a small table to illustrate the effects:
Technique Description Visual Example Hatching Parallel lines to create tone. (Image of hatched lines) Cross-Hatching Intersecting lines for darker values and texture. (Image of cross-hatched lines)
-
-
Blending: Explain how to blend charcoal using different tools to create smooth transitions and soften edges.
-
Lifting (Erasing): Show how to use erasers to create highlights, textures, and correct mistakes.
-
-
Value Control:
- Understanding Values: Explain the concept of light and dark values and how they create form and depth.
- Creating a Value Scale: Suggest creating a value scale using charcoal to practice controlling the darkness of your tones.
Drawing Evergreen Foliage: The Heart of the Subject
This is where you delve into the specifics of depicting evergreen needles and branches using charcoal.
-
Breaking Down the Structure:
- Observing Branch Patterns: Explain how evergreen branches typically grow and how the needles are arranged on the branches.
- Simplifying Shapes: Suggest breaking down complex foliage into simpler shapes to make it easier to draw.
-
Creating Texture and Detail:
- Needle Groupings: Demonstrate how to draw clumps of needles rather than individual needles for a more realistic effect.
- Varying Pressure: Show how to vary pressure on the charcoal to create different tones and textures in the foliage.
- Adding Highlights and Shadows: Explain how to use highlights and shadows to create the illusion of depth and dimension in the foliage.
-
Specific Evergreen Types (Optional):
- If space allows, consider including sections on drawing different types of evergreens (pine, spruce, fir) and highlighting their unique characteristics.
Adding Depth and Atmosphere: Taking It to the Next Level
This section will cover techniques to enhance the sense of depth and atmosphere in your "charcoal evergreen drawing."
-
Atmospheric Perspective:
- Diminishing Detail: Explain how to use lighter tones and less detail for objects in the distance to create the illusion of depth.
- Softening Edges: Suggest softening the edges of distant objects to further enhance the atmospheric effect.
-
Creating a Sense of Light:
- Identifying the Light Source: Explain the importance of establishing a clear light source.
- Controlling Contrast: Show how to use contrasting values to create dramatic lighting and emphasize the form of the evergreens.
-
Adding Context:
- Background Elements: Suggest adding subtle background elements (sky, ground, other trees) to create a more complete and immersive scene.
- Adding Details: Including birds, animals, or small details can add interest and realism to the drawing.
Practice and Experimentation: The Key to Mastery
- Encourage experimentation with different techniques and materials.
- Suggest practicing drawing different types of evergreens in various lighting conditions.
- Advise readers to study reference photos of evergreens to improve their understanding of their form and texture.
- Emphasize the importance of patience and persistence.
This structure will provide a clear, informative, and engaging guide to creating "charcoal evergreen drawing." Good luck!
FAQs About Mastering Charcoal Evergreen Drawings
This FAQ section answers common questions about creating stunning charcoal evergreen drawings. We hope these insights clarify the techniques and secrets revealed in our main article.
What makes drawing evergreens with charcoal different from other subjects?
Evergreens have intricate needle or scale patterns. Charcoal allows you to capture the subtle value changes and textures more effectively than other mediums, creating a realistic and detailed charcoal evergreen drawing.
What kind of charcoal works best for evergreen drawings?
A combination of vine and compressed charcoal is ideal. Vine charcoal allows for light sketching and initial value studies, while compressed charcoal provides the deep blacks needed for defining shadows and details in your charcoal evergreen drawing. Charcoal pencils also help fine details.
How do I avoid making my evergreen trees look flat and lifeless in my charcoal drawings?
Focus on creating depth through value. Vary the pressure on your charcoal to achieve different shades. Overlap branches and needles strategically. Use highlights and shadows to sculpt the form and give a 3D effect to your charcoal evergreen drawing.
What’s the best way to represent individual needles or scales in a charcoal evergreen drawing?
Avoid drawing every single needle individually. Instead, focus on suggesting the overall texture and mass. Use short, directional strokes to indicate the needle or scale patterns. Varying the darkness and thickness of these strokes will enhance the realism of your charcoal evergreen drawing.
So, grab your charcoal, find a beautiful evergreen, and get creating! There’s so much to explore when it comes to charcoal evergreen drawing. Have fun!