Understanding perspective is crucial when you want to draw a wagon. The Art Institute of Chicago provides excellent resources for studying artistic techniques, which are valuable for mastering this skill. Sketching pencils and a good eraser are essential tools for beginners looking to improve their ability to draw. With practice and attention to detail, anyone can draw a wagon like a pro by following simple steps, starting with basic shapes and gradually adding details.
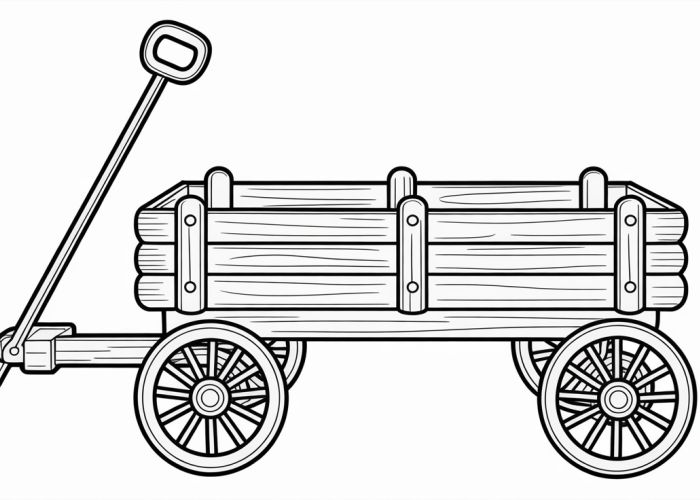
Draw A Wagon Like A Pro: Simple Steps For Everyone!
Want to learn to draw a wagon that looks fantastic? Whether you’re a beginner or have some drawing experience, these simple steps will guide you through the process. We’ll break down the drawing into manageable parts, making it fun and achievable for everyone. Let’s get started!
1. Gather Your Supplies and Plan Your Wagon
Before we put pencil to paper, it’s important to have everything ready. This will make the drawing process smoother and more enjoyable.
1.1 Essential Drawing Tools
- Paper: Choose a smooth drawing paper. Standard printer paper works well for practice.
- Pencils: A range of pencils (HB, 2B, 4B) is ideal for different line weights and shading. An HB pencil is great for initial sketches.
- Eraser: A good quality eraser is crucial for correcting mistakes and refining your drawing. A kneaded eraser is especially useful for lifting graphite without damaging the paper.
- Sharpener: Keep your pencils sharp for precise lines.
- Optional Tools: Ruler (for straight lines), compass (for perfect circles), colored pencils (for adding color).
1.2 Types of Wagons and Design Considerations
Think about the kind of wagon you want to draw. Are you envisioning an old-fashioned covered wagon, a playful children’s wagon, or a sturdy farm wagon? Each type has its own unique characteristics.
- Covered Wagon: Features a fabric or canvas cover stretched over a frame.
- Children’s Wagon: Usually smaller, with a simple handle and four wheels.
- Farm Wagon: Typically larger and more robust, designed for hauling heavy loads.
Consider these elements:
- Size and Proportions: How big is the wagon body compared to the wheels?
- Wheel Style: Are the wheels spoked or solid?
- Materials: What material is the wagon made of (wood, metal, canvas)?
2. Sketch the Basic Shapes
This is where we start building the foundation of our wagon. We’ll use simple geometric shapes to outline the main components.
2.1 The Wagon Body
- Rectangle/Trapezoid: Start by sketching a rectangle or trapezoid to represent the main body of the wagon. The shape you choose will depend on the style of wagon you’re drawing.
- Rectangle: For a more modern or simple wagon.
- Trapezoid: For a more traditional or sloped wagon.
2.2 The Wheels
- Circles: Draw four circles (or ellipses for perspective – see section 3) to represent the wheels. Two at the front and two at the back.
- Placement: Position the circles so they are touching (or slightly overlapping) the bottom of the wagon body.
- Size: Make sure the wheels are proportionally sized to the wagon body. Large wheels for a heavy-duty wagon, smaller wheels for a children’s wagon.
2.3 The Axles
- Lines: Draw horizontal lines connecting the wheels on each side. These represent the axles.
3. Adding Perspective and Depth
Making your wagon look 3D will greatly enhance the realism of your drawing. Here’s how to achieve that.
3.1 Understanding Perspective
Perspective is the art of representing three-dimensional objects on a two-dimensional surface to create the illusion of depth.
3.2 Applying Perspective to the Wheels
- Ellipses: Instead of perfect circles, draw ellipses for the wheels that are further away from the viewer. The further away a wheel is, the flatter the ellipse should be. Think of it like looking at a plate directly versus looking at it from the side.
- Overlapping: Ensure the wheels that are closer overlap those further away, creating the illusion that one wheel is in front of the other.
3.3 Wagon Body Perspective
- Vanishing Point (Optional): While not essential for a simple wagon drawing, understanding vanishing points can help with more complex scenes. If you’re showing the wagon from a specific angle, lines on the wagon body should converge towards a vanishing point on the horizon. This creates a sense of depth and realism. For beginners, simply tapering the back of the wagon body slightly will suffice.
4. Detailing the Wagon
Now comes the fun part – adding the details that make your wagon unique and interesting!
4.1 Wagon Body Details
- Sides and Panels: Add wooden planks or metal panels to the sides of the wagon. Use slightly curved lines to give them a more realistic feel.
- Edges and Corners: Round off any sharp corners to make the wagon look more natural.
- Reinforcements: Draw metal bands or brackets to reinforce the wagon’s structure.
4.2 Wheel Details
- Spokes (if applicable): If your wagon has spoked wheels, carefully draw the spokes radiating from the center hub to the outer rim. Use a ruler to help keep the lines straight and evenly spaced.
- Tires: Add a thicker line around the outside of the wheel to represent the tire.
- Hub Caps: Draw small circles or shapes in the center of the wheels to represent hub caps.
4.3 The Handle or Tongue
- Shape and Length: Draw the handle or tongue extending from the front of the wagon. The shape and length will depend on the type of wagon.
- Hitching Mechanism: Add details like a ring or hook at the end of the tongue for attaching to an animal or vehicle.
- Handle Grip: If it’s a children’s wagon, add a comfortable grip to the handle.
5. Shading and Adding Depth
Shading brings your drawing to life by creating a sense of light and shadow.
5.1 Identifying the Light Source
- Direction: Decide where the light is coming from (e.g., top left).
5.2 Applying Shading
- Darker Areas: Shade the areas that are furthest away from the light source.
- Under the Wagon Body: Add shadow underneath the wagon body where it meets the wheels.
- On the Wheels: Shade the areas of the wheels that are facing away from the light.
- Inside the Wagon Body: Shade the inside walls of the wagon.
- Lighter Areas: Leave the areas facing the light source relatively untouched or use lighter shading.
- Gradual Transitions: Blend your shading to create smooth transitions between light and dark areas. Use the side of your pencil lead to apply shading evenly.
5.3 Using Different Pencil Grades
- 2B and 4B: Use softer pencils (2B, 4B) for darker shadows.
- HB: Use the HB pencil for lighter shading and highlights.
6. Final Touches and Refinements
This is the time to step back and look at your drawing critically.
6.1 Review and Adjust
- Proportions: Check that all the elements of your wagon are proportionally sized.
- Details: Add any missing details that you feel are necessary.
- Lines: Refine your lines and erase any unnecessary guidelines.
6.2 Adding Texture (Optional)
- Wood Grain: Add subtle lines to simulate wood grain on the wagon body.
- Surface Imperfections: Introduce small imperfections to the surface to make it appear more realistic.
6.3 Adding Color (Optional)
- Colored Pencils: Use colored pencils to add color to your wagon. Experiment with different colors and shades to create a unique look.
- Blending: Blend your colors to create smooth transitions.
Enjoy your finished wagon drawing! The more you practice, the better you’ll become. Don’t be afraid to experiment with different styles and details to create your own unique wagons.
FAQs About Drawing a Wagon
Here are some common questions about learning to draw a wagon using our simple step-by-step guide.
What kind of paper and pencil should I use to draw a wagon?
Any paper will work to start. Smooth paper is better for details, but regular printer paper is fine for practice. A standard #2 pencil is great. You might also want an eraser. Don’t overthink it – just start drawing a wagon!
What if I’m struggling with getting the wagon’s proportions right?
Focus on drawing the basic shapes first. Think of the wagon body as a rectangle and the wheels as circles. Once those are in place, you can refine the details. It’s easier to adjust the whole shape first than to try and fix individual lines later. Drawing a wagon relies on getting the proportions right, so take your time!
How do I make my drawing of a wagon look more realistic?
Add details! Think about where the light is coming from and add shading to create depth. Details like wood grain, bolts, and the handle’s texture will make the wagon look more realistic. Remember that drawing a wagon also involves observation – look at real wagons for inspiration!
Is it okay if my first few attempts at drawing a wagon don’t look perfect?
Absolutely! Practice makes perfect. Don’t be discouraged if your first few wagons look a little wonky. Keep practicing the steps and you’ll improve. The more you draw a wagon, the better you’ll get at it!
And that’s how you draw a wagon! Go grab your pencil and give it a shot – you might surprise yourself. Happy drawing!