Discovering effective methods to flatten water damaged paper can be crucial when disaster strikes cherished documents. Archival preservation techniques offer solutions, such as controlled drying, which help minimize further deterioration. Implementing a blotting technique, utilizing absorbent materials like acid-free paper, aids in removing excess moisture gently. Understanding the impact of humidity on paper fibers is key to understanding what solutions will be needed to ensure proper flattening and preservation. Many approaches exist, but following these steps will help you flatten water damaged paper and ensure these keepsakes can be preserved.
Flatten Water Damaged Paper: Save Your Precious Documents!
Water damage can be devastating to important documents, from family photos to crucial business records. But don’t despair! Often, you can successfully flatten water damaged paper and salvage these irreplaceable items. This guide outlines the best techniques for doing just that, minimizing further damage and restoring your documents to a more manageable state.
Initial Assessment and Preparation
Before you begin the process of trying to flatten water damaged paper, it’s essential to evaluate the extent of the damage and take the necessary precautions.
Assessing the Damage
The degree of water damage will determine the most appropriate method. Consider these factors:
- Severity: Is the paper slightly damp, soaked, or severely deteriorated? Heavily damaged items might require professional conservation.
- Type of Paper: Is it coated, glossy, thin, or thick? Coated paper is more likely to stick together.
- Ink/Media: Is the ink running or smudging? Certain inks are more susceptible to water damage.
- Mold/Mildew: Are there any signs of mold or mildew growth? If so, handle with extra care and consider using appropriate protective equipment.
Essential Supplies
Gather the following supplies before you start:
- Clean, absorbent towels or cloths: Lint-free options are preferable.
- Blotting paper or unprinted newsprint: This will absorb moisture without transferring ink.
- Weights: Books, bricks, or other heavy, flat objects.
- Waxed paper or parchment paper: To prevent sticking.
- A well-ventilated area: Essential for drying.
- Gloves: To protect your hands and prevent further damage to the documents.
- Face mask (optional): If mold is suspected.
Immediate Actions
- Separate the sheets: Carefully separate the wet pages to prevent them from sticking together permanently. Use a spatula or thin plastic tool to gently pry them apart if necessary.
- Remove excess water: Gently blot the surfaces of the documents with clean towels to absorb excess water. Avoid rubbing, which can damage the paper and smear the ink.
- Freezing: For very large quantities or if you can’t address the problem immediately, consider freezing the documents. This will prevent further deterioration and mold growth. Place documents in airtight plastic bags and freeze. You can then thaw and dry them later.
Drying and Flattening Techniques
There are several effective methods for flattening water damaged paper. Choose the method that best suits the type and extent of the damage.
Air Drying
Air drying is a gentle and effective method for slightly damp documents.
- Lay flat: Place the document on a clean, flat surface covered with absorbent material (towels or blotting paper).
- Blot: Gently blot both sides of the document to remove excess moisture.
- Weight (optional): Place a light weight on top of the document to help it flatten as it dries. Make sure the weight is evenly distributed.
- Ventilation: Ensure good air circulation in the room to speed up the drying process.
- Turn Regularly: Turn the document periodically to ensure even drying.
Pressing
Pressing is suitable for more severely wrinkled or warped documents.
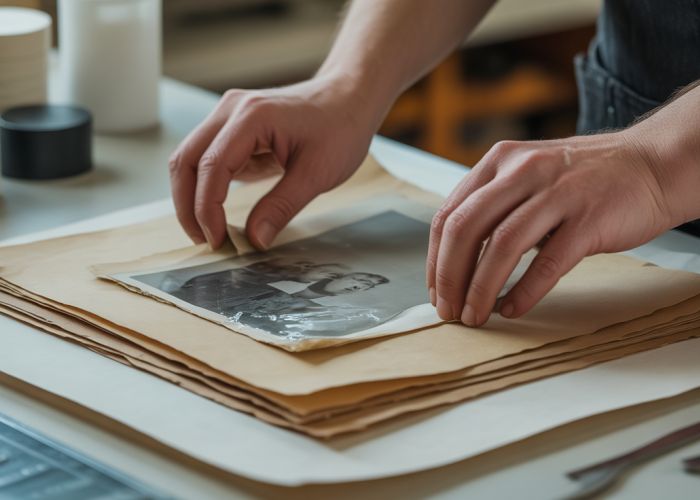
- Interleave with blotting paper: Place the water-damaged document between sheets of clean blotting paper or unprinted newsprint.
- Protect with waxed paper: Place sheets of waxed paper or parchment paper on either side of the stack of blotting paper to prevent sticking.
- Weight: Place a heavy, flat object (such as books or a brick) on top of the stack.
- Patience: Leave the document under pressure for several days, changing the blotting paper regularly (every 12-24 hours) until the paper is completely dry.
- Tip: For very thick documents, you can build a "sandwich" of blotting paper and waxed paper around each page individually.
Ironing (Use with Extreme Caution!)
Ironing is a more aggressive method and should only be used on sturdy paper with stable ink. It carries a higher risk of damage.
- Low Setting: Use the lowest heat setting on your iron and ensure it is completely dry (no steam).
- Protection: Place the document between two sheets of clean, dry cloth (e.g., a pillowcase or t-shirt).
- Brief Press: Quickly and gently press the iron over the cloth-covered document. Avoid leaving the iron in one place for too long.
- Check Frequently: Regularly check the document’s progress and stop if you notice any damage.
Table: Drying Methods Comparison
| Method | Suitability | Pros | Cons | Risk Level |
|---|---|---|---|---|
| Air Drying | Slightly Damp Paper | Gentle, Simple, Low Risk | Slow, May Not Completely Flatten Heavily Wrinkled Paper | Low |
| Pressing | Moderately to Severely Wrinkled Paper | Effective Flattening, Suitable for Various Paper Types | Requires Time, Needs Regular Blotting Paper Changes | Medium |
| Ironing | Sturdy Paper, Stable Ink (Use with Caution!) | Fast Flattening | High Risk of Damage (Burning, Ink Smearing), Uneven Drying | High |
Preventing Future Water Damage
Prevention is always better than cure. Here are some tips to help protect your important documents from water damage:
- Storage: Store documents in waterproof containers or in high, dry locations.
- Digital Backups: Scan important documents and store them digitally (cloud storage, external hard drives).
- Insurance: Check your insurance policy to see if it covers water damage to documents.
By following these steps, you can significantly improve your chances of flattening water damaged paper and preserving your precious documents for years to come.
Flatten Water Damaged Paper: FAQs
Here are some frequently asked questions about rescuing water-damaged documents. We hope these answers help you save your precious papers!
How long do I have to start the flattening process?
The sooner you act, the better. Mold growth can begin within 24-48 hours on water damaged paper. Aim to start drying and flattening as quickly as possible.
Can I use a regular iron to flatten water damaged paper?
No, a regular iron is not recommended. It can cause further damage from the heat and steam. Consider using a book press or weight under blotting paper instead. This provides gradual pressure.
What if the pages are stuck together?
Don’t force them apart. Gently dry the clump of water damaged paper first. Once partially dry, carefully try to separate the pages, using a thin tool like a microspatula if needed.
Are heavily damaged documents salvageable?
Severely damaged documents with extensive mold, tearing, or disintegration might be beyond repair. Professional restoration services can sometimes help, but it depends on the level of damage. They have specialized techniques to flatten water damaged paper in these situations.
So, there you have it! Hopefully, you feel a bit more confident about tackling the task of flatten water damaged paper now. Good luck bringing those soggy memories back to life!